New release of Import Image 2 Lotus Notes! Included is a Command Line Interface!
Category Import Image 2 Lotus Notes
Import Image 2 Lotus Notes (II2LN) has been quite coupled to Lotus Notes for years, it's even in the name - Import Image 2 Lotus Notes... Over the years I have received numerous requests for creating a command line interface, which would allow you to operate II2LN from command prompts and bacth files. Today release 1.7 includes an II2LN.EXE program which will let you do many cool things with II2LN without needing to involve Lotus Notes at all!
Have a photo frame? The command line interface can used to turbo-charge you new photo frame with some cool image tricks!
While the command
line interface (CLI) is new and cool the real changes are all within the
core II2LN DLL, meaning that you of course can benefit from the new features
within traditional II2LN concept of using LotusScript and Notes as your
host. Therefore, all the new functions and import options are all available
to both the DLL and the CLI.
Remember, import options are a sequence of parameters given to almost all functions in II2LN. By using multiple import options, such as Rotate, Resize, OverlayImage and OverlayText, you perform multiple actions on the image with a single function call, making II2LN pretty efficient.
The general syntax is;
II2LN <Source file> <Switches>
The Source file is first and foremost the file specifier logic as you know it from your usage with LotusScript and the functions in II2LN. It can be a specific path and file name such as C:\Temp\Akropolis, Greece 2010.jpg -or- it can be an URL such as https://www.vcode.no. The latter form actually grabs a page at the given URL and instantly transforms it to an image!
In addition, specially for the command line interface, the Source file can be a DOS Wildcard search pattern, such as C:\Temp\*.jpg or \\MyNAS01\Photos\*.png. This will make II2LN process all the files that match the search pattern! This makes it fairly easy to create solutions like;
New import options in this version
Remember, import options are a sequence of parameters given to almost all functions in II2LN. By using multiple import options, such as Rotate, Resize, OverlayImage and OverlayText, you perform multiple actions on the image with a single function call, making II2LN pretty efficient.
- PhotoFrame.
With the PhotoFrame import option you simply stamp a transparent photo
frame image on top of an image. This is similar to what OverlayImage do,
but intended to be simpler to use since you are dealing with true transparency,
its easy to for example use the frames that are included in Paint Shop
Pro or find some on the net.
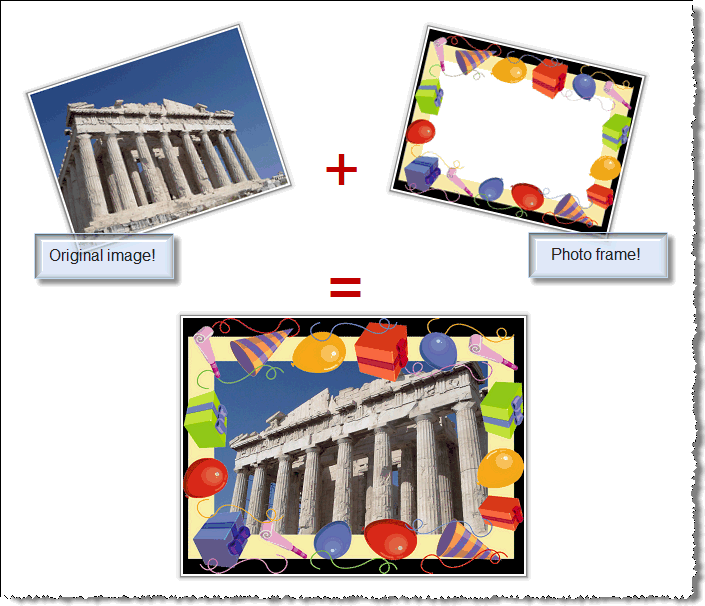
Above you see how we have grabbed the original Acropolis and placed the transparent Birthday-frame on top of it. You control all aspects of the photo frame, and create very subtle transparency effects. The Photoframe-import option can also be repeated, so its easy to add multiple frames if you need to!
- UseHTMLTemplate.
The last years we have seen super cool HTML and CSS tricks come onto the
scene. Take a look at WebDesignerWall,
where you will see how to frame and append effects to images with relativly
simple HTML and CSS coding. Another example is at the site of David
Chambers Design,
which shows you how to apply cool semi-transparent captions onto
your images. The UseHTMLTemplate let you run your image such templates
and you get the result back as an image!
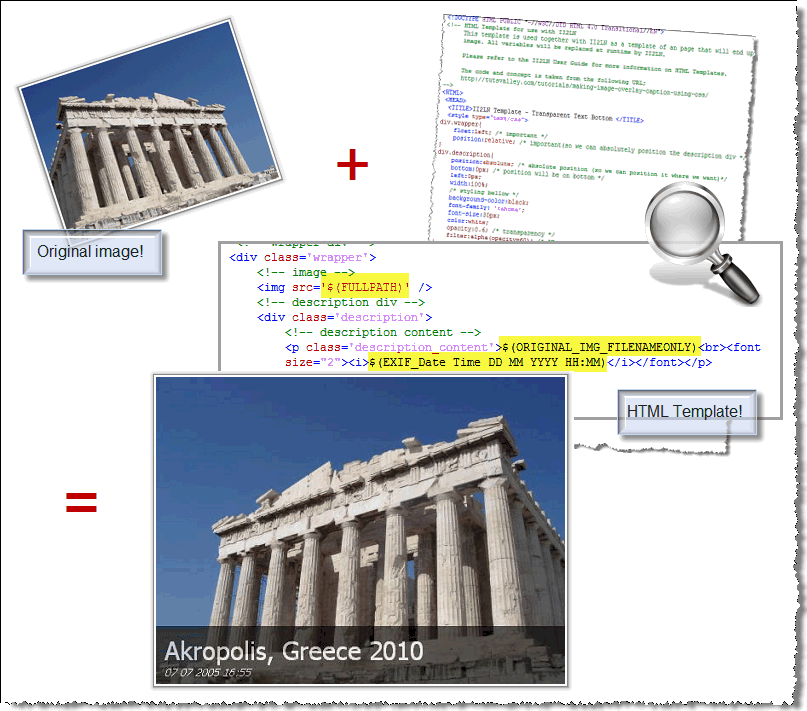
Above we see the original Acropolis image. Note by the way, that the file name is simply "Akropolis, Greece 2010.jpg". We feed that image into our HTML Template which contains a couple of variables. The $(FULLPATH) simply points to the image we are processing, and thus makes this HTML a template which can be used on any image! Then we have image variables like $(ORIGINAL_IMG_FILENAMEONLY) and $(EXIF_Date Time DD MM YYYY HH:SS). These variables is of course related to the image we process, and you can use all imbedded EXIF and IPTC variables, in addition to all II2LN-variables.
Finally, the UseHTMLTemplate is not limited to plain HTML and CSS. Why not have some javascript enabled, ActiveX or Flash? II2LN should be capable of using most HTML out there!
- AddVariable.
You've seen how image variables can be used in the HTML Templates above.
What if you want to add something on your own, such as COPYRIGHT and BYLINE?
Simple, use the repeatable AddVariable import option like this;
AddVariable:COPYRIGHT,(c) Copyright Voith's CODE and AddVariable:BYLINE,All images by Robert Ibsen Voith. These two calls will make the variables $(COPYRIGHT) and $(BYLINE) available to use in HTML Templates and other variable processing such as the ReplaceWithVariable import option!
New functions
These are functions which you can use via the LotusScript Declare statement, and use directly in your code.
- RotateII2LNImage.
Allow you to quickly rotate- or flip your image. This function will also
ensure that your image has the dreaded EXIF Orientation tag set correctly.
See more on the EXIF orientation on SetII2LNExifOrientation below!
- CopyII2LNImage.
Quickly copy a file to another. Unlike the existing ConvertImage-
or ProcessImage functions, your image won't be altered in any way.
- MoveII2LNImage.
Quickly move an image from one directory to another. The same goes for
this function as for CopyII2LNImage. Full image fidelity is preserved.
- SetII2LNExifOrientation.
Do you have a bunch of images which you have already rotated to look
alright in your favorite image organizer? Then you try to bring up those
images on your Windows Media Center just to see lots of wrongly rotated
images again??? Welcome to the world of image auto-orientation!!! The reason
for this behaviour is that many digital cameras has a sensor that knows
how you hold the camera when you take a picture. This info is stored in
the image as one of many EXIF tags. Then "smart" programs comes
along and wants to auto-orientate things for you, so you see all your images,
both landscape and portraits, oriented the correct way for viewing. This
is all well and swell if you use only a single program! The problem gets
worse when when you rotate and organize the images in programs which don't
also update the EXIF orientation tag.
In order to circumvent the auto-orientation frenzy in many programs, the solution is to tell the image that it is oriented correctly already. This process is called "orientation normalization", The SetII2LNExifOrientation import option force an orientation value to the image.
II2LN.exe - The Command Line Interface
The general syntax is;
II2LN <Source file> <Switches>
The Source file is first and foremost the file specifier logic as you know it from your usage with LotusScript and the functions in II2LN. It can be a specific path and file name such as C:\Temp\Akropolis, Greece 2010.jpg -or- it can be an URL such as https://www.vcode.no. The latter form actually grabs a page at the given URL and instantly transforms it to an image!
In addition, specially for the command line interface, the Source file can be a DOS Wildcard search pattern, such as C:\Temp\*.jpg or \\MyNAS01\Photos\*.png. This will make II2LN process all the files that match the search pattern! This makes it fairly easy to create solutions like;
- Produce images
for your photo frame by having all the original images in one place, and
use II2LN.exe to "produce" them to an USB stick or SD card for
your photo frame. Since photo frames often aren't loaded with memory, its
no point in transferring 2.5 MB images that not only quickly will fill
up the frame's memory, but also will be slow to load and resize for display
(not to talk about the auto-orientation mentioned above!!). By using II2LN
with parameters like this;
ii2ln "\\MyNAS01\Photos\Photos for photo-frame\*.*" "-targetpath:C:\Temp\NextBase Images" "-target:$(ORIGINAL_IMG_SORT_TIMESTAMP) - $(ORIGINAL_IMG_FILENAMEONLY).jpg" "-importoptions:resize:800,600"
The blue string is the source file specification which grabs all files in a specific directory on my NAS. The green string is the -targetpath-switch which tells II2LN to place all processed files in a local folder. The red string is the -target-switch which tells II2LN to rename all produced files according to the EXIF date (yes, II2LN is now also an effective file renamer, which can use all EXIF info in file name templates!). Finally the last black string is the import options telling II2LN to resize the images to mere 800 x 600 pixels, which happens to be the capability of my photo frame.
- Use II2LN command
line interface as an EXIT tag aware file renamer. Convert those DSC102345.JPG
to sensible file names such as 2010-03-30 124500 - Canon Powershot G11
- GPS-10.59.10 .jpg.
ii2ln "\\192.168.100.12\Qmultimedia\Photos\Familien Voiths bilder\2000 - Foto ramme\*.*" -slfn -pause "-targetpath:C:\Users\voirob.TINE\Pictures\NextBase PhotoM@il25 10 Fotoramme" "-target:$(ORIGINAL_IMG_SORT_TIMESTAMP) - $(ORIGINAL_IMG_FILENAMEONLY).jpg" "-uht:Transparent Text Bottom" "-importoptions:Resize:800,600;CANVASFORMATWITHCOLOR:4,3,000000;;NOCLIPRECTONHTMLTEMPLATE:1;photoframe:C:\Users\voirob.TINE\Pictures\II2LN Fotorammer\Laget med II2LN.png"
- Integrate II2LN
in your File Explorer and have a quick way of visually rotating - and
setting that pesky EXIF Orientation tag - in one go!
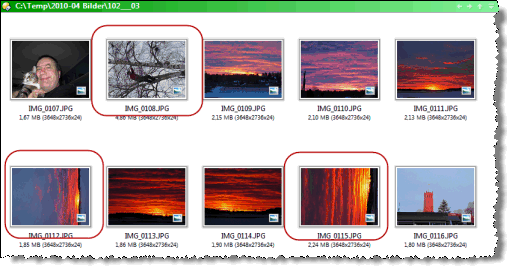
The way I use these features myself, is that I use an File Explorer-tool called Directory Opus, which has a nice thumbnail view. Normally Directory Opus will also auto-orient the images for you, but I have turned that off so I can see the images I need to treat;
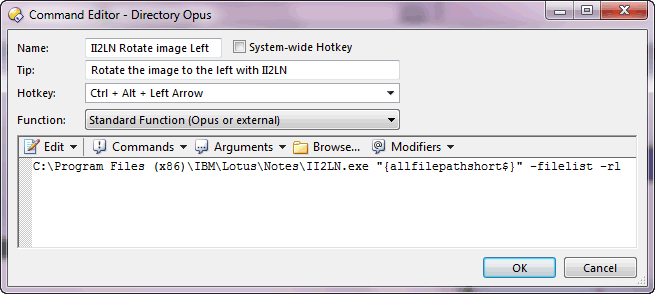
In the image above I see three images which all needs to be rotated 90 degrees to the right. I Directory Opus I have set up a couple of key board hotkeys to allow for quick II2LN command line interface rotation, like this;
The II2LN.EXE command line interface is called, and Directory Opus simply feed all the selected file-paths to it, together with the switches -filelist and -rl (Rotate Left) and -rr (Rotate Right) respectively. As you see I have assigned the left command to the hotkey CTRL + ALT + LEFT ARROW and the right command to CTRL + ALT + RIGHT ARROW.
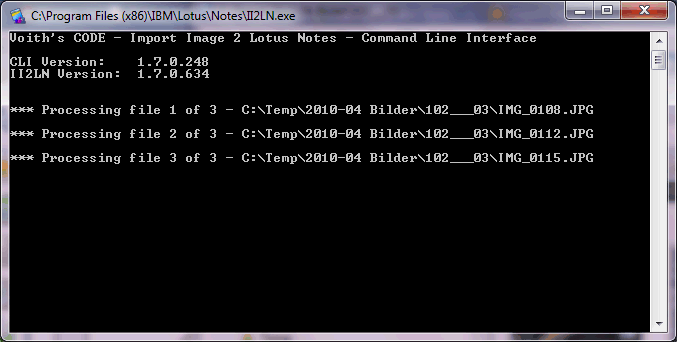
To rotate those three files, I just select them and press CTRL + ALT + RIGHT ....
Voila!
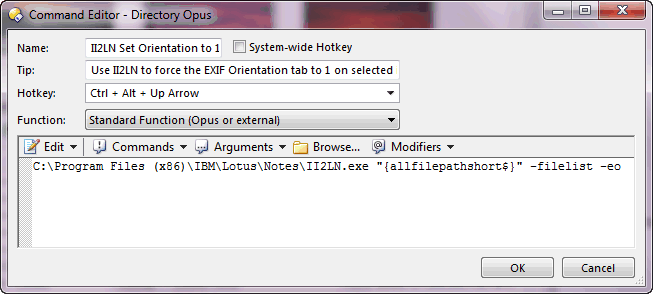
By the way, I have also created a hotkey for just setting the EXIF Orientation correctly. The reason for this is that I want to normalize old images which has suffered from the EXIF Orientation problem for years. Below you see how I have created that hotkey in Directory Opus;
The essence here is the parameter -eo (or -exiforientation) which force the EXIF Orientation to 1 on the selected files.
The best way to learn about all these details, is in the included User's Guide.
