![]()
![]()
![]()
![]()
|
|
|
|
|
The Notes toolkits comes with more and more samples for each release. As stated before, many of these samples are quite good. This subject therefore covers how you can build these samples.
|
|
|
|
|
The samples often need some databases to work on. The notedata-directory contains these databases. Somehow Lotus Notes must be aware about these databases whereabouts, and you have two choices:
I prefer the latter method, since I can keep the toolkit in one place and have minimal impact on the standard Notes installation. You create a directory link file by doing the following steps:
Your API programs (and Lotus Notes) will now treat the files in the toolkit as if they where placed directly under the main Notes data directory. By the way, you can use this trick for all other purposes as well!
|
|
|
|
|
You don't want to see this error when tou run your C++ application:

This means that the C++ API runtime DLL LCPPN2x.DLL has to be put into the Notes program directory as described here.
|
|
|
|
|
The reason for this is that our C++ API programs eventually will use the core Notes functions in the Notes C API. These function are stored in several DLLs in the Notes program directory. When the API application or DLL initializes it must authenticate with Notes, and this is done via an Notes ID file. If the Lotus Notes client itself aren't running, the API must determine which user ID to use. This information is stored in the configuration file Notes.ini, which often are placed in the Notes data directory
|
|
|
|
|
What is NMAKE ?
In the Help documentation you'll see that Lotus specify how to use the NMAKE-tool. You'll see commands like this:
nmake /f mswin32.mak
In the "old days", all compiler and linker tools where command-line tools. In fact, they still are! If you search your Visual Studio-directories, you'll find the compiler as CL.EXE and the linker as LINK.EXE. So what is Visual Studio then ? It's merely a fancy wrapper around these command-line tools, making them concidaerably easier to use.
NMAKE is also a wrapper aorund the compiler and linker, and operates on a so-called make-file. The make-file contain all kinds of definitions and instructions for the CL.EXE and LINK.EXE. By using the command above, you will compile and link the application, just as if you where using Visual Studio.
In short, NMAKE is a non-GUI version of Visual Studio!
Your first compile
... will typically end like this
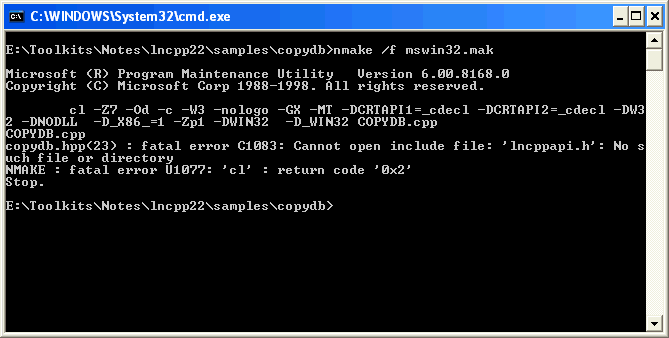
The error here is that the compiler can't open include file 'lncppapi.h', the main include file of the C++ API.
This is because the Command-prompt itself doesn't know where to look for the header- or library files. What ? Didn't we specify a bunch of this stuff in Visual Studio ??? Yes, but Visual Studio is a separate application, with no direct link to the Command-prompt in Windows. In other words, the Command prompt does not know of any compiler, and absolutely nothing about include- and library files - unless we tell it to!
Do you remember the following dialogbox from the Visual Studio install ?
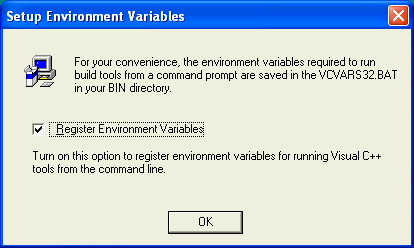
It's purpose is to deal with Visual Studio environment variables. This is an old relic from the MS-DOS area where many application-options where controlled via the environment variables in the operating system. PATH is one of the more known variables ...
The early Visual Studio compiler and linker required that the environment variables INCLUDE and LIB where present and that they specified where the header-files and libraries where placed respectivly. In other words, these two variables has a very similar purpose compared to the global directory settings in Visual Studio as we know them to day.
So, the Visual Studio-installer will actually register the necessary INCLUDE- and LIB directories for you if you enable the Register Environment Variables in the dialogbox above.
But, there is a little problem! It will only register the INCLUDE- and LIB variables for the compiler and linker itself ... and therefore it will not know where you have put your Notes C and C++ toolkits! Our next task is therefore to write a little batch-file which will extend the INCLUDE- and LIB environment variables with our own specifications. Note that I say extend, since we don't want to wreck the system setup of Visual Studio!
The batch file
Before you make a batch file, you could either extend the Visual Studio-supplied VSVARS32.BAT file -- OR -- create a new one, extending the settings set by the VSVART32.BAT file.
The purpose of the VSVARS32.BAT is to set the INCLUDE- and LIB variables as described above. We want to extend those settings with the directories to our Notes C and C++ APIs.
Since we're going to append the INCLUDE- and LIB-directories you should probably write down the extact directory names. Remember you did specify the same directories here, so you could also select to copy them directly from there.
If you at the bottom of the VSVARS32.BAT - OR- in your new BAT file write these two lines:
![]()
On my computer I would have these two lines:
Save the file.
When you run the batch file, you will extend the environment variables to include the Notes C and C++ API directories.
Now the NNAME-command will work, but pay attention to the next step!
Your second compile
Oops, we are not quite there yet !
It is not easy for a up-and-coming API programmer to see what is wrong here. So let me tell you. If you have problems with files like MQ, LNMQ or similar, you should enter these two lines in the main C or CPP file.
#include <WTypes.h>
#define NOPRIORITY MAXWORD
Why ? I really don't know, but it has something to do with so-called defines not been in the correct order. The two lines above fix the problem!
Below you see the code above inserted into the sample COPYDB.CPP:

